The safest way to get food out of a wisdom tooth hole is to use a gentle saline rinse or a plastic irrigation syringe filled with a 0.9% saltwater solution. You must avoid pushing the debris deeper into the socket or dislodging the protective blood clot that forms over the first 72 hours.
A trapped piece of food is not just annoying. It is a bacterial fuel source sitting directly on an open surgical wound. The American Association of Oral and Maxillofacial Surgeons (AAOMS) warns that food impaction in the extraction socket is a primary contributor to delayed healing and alveolar osteitis, the painful condition commonly called dry socket.
This guide walks you through a three-step removal protocol, explains exactly how to mix the correct saline solution, and provides a day-by-day diet plan to prevent food from getting stuck in the first place. Every technique described here aligns with AAOMS post-operative care guidelines for the year 2026. You will also learn to distinguish between a harmless piece of scrambled egg and the whitish granulation tissue that is a normal sign of healing.
How to Get Food Out of a Wisdom Tooth Hole
To get food out of a wisdom tooth hole, start with a gentle warm saline rinse, progress to a plastic irrigation syringe if the rinse fails, and never use sharp objects, finger probing, or high-pressure water streams. The removal method must match the stage of your healing.
Post-operative healing happens in phases. During the first 48 hours, the blood clot in the socket is fragile and jelly-like. Any aggressive rinsing can wash it out. During this period, you should only use a passive rinse. Take a mouthful of the saline solution, tilt your head gently from side to side, and let the liquid fall out of your mouth into the sink. Do not swish. Do not spit.
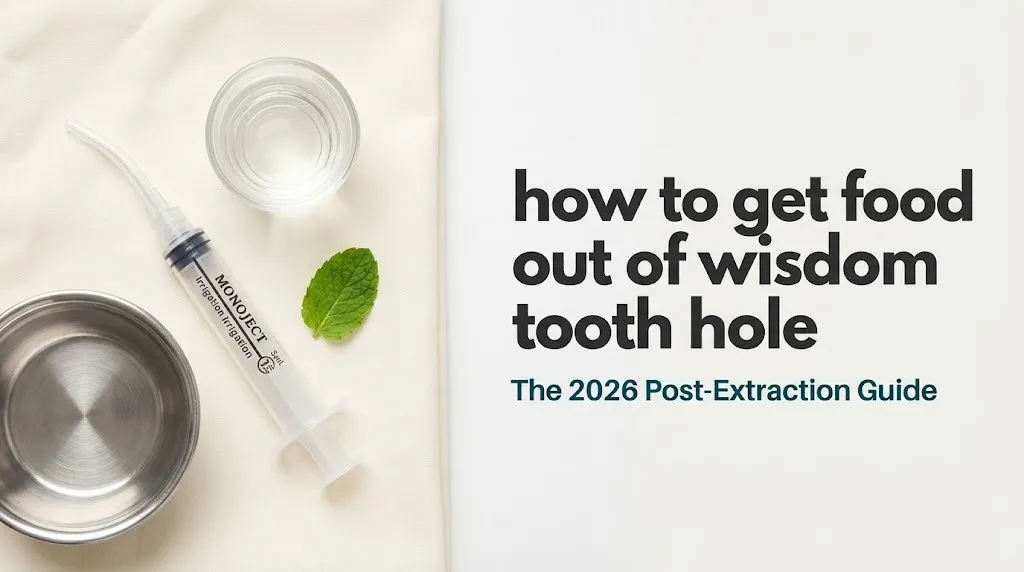
After 72 hours, the clot begins to organize into granulation tissue and becomes more stable. Your oral surgeon may have provided a curved-tip Monoject syringe for this phase. If the gentle rinse does not dislodge the food, the syringe becomes the appropriate tool, used with precise technique. The full irrigation protocol is detailed later in this guide.
Quick Tip:
- Mix the saline solution fresh every time you rinse. Do not store it in a cup for the whole day.
- Rinse after every meal or snack, even if the meal was just a protein shake.
Key Takeaway: Match the tool to the timeline. Gentle rinse only for 48 hours. Syringe irrigation only after 72 hours and only if your surgeon has cleared you.
How to Tell If Food Is Stuck in a Wisdom Tooth Hole
You can tell food is stuck in a wisdom tooth hole if you feel a persistent, localized pressure or a foreign body sensation in the socket that does not resolve with gentle swishing. You may also detect a foul taste or notice a white or brownish speck visible in the mirror that looks distinct from the surrounding tissue.
The sensation of a trapped food particle is different from the normal dull ache of healing. Food impaction often creates a specific point of tenderness. If you tap your finger lightly against your cheek near the socket and feel a sharp or shifting sensation, that is a strong indicator of a physical particle moving within the socket.
Visual inspection requires good lighting and a small dental mirror if you have one. Healthy healing tissue is pinkish-red and firmly attached. A food particle looks distinct. A piece of white bread or rice appears as a mushy, opaque mass. A piece of spinach or herb appears as a dark green fleck. The color and texture contrast with your tissue. The difficulty is that granulation tissue, which is a normal part of healing, also appears whitish. This distinction is so important that it has its own section later in this guide.
Signs you likely have a food particle lodged in the socket:
- A sudden onset of localized pressure or a sensation of something “stuck” after eating
- A new, persistent bad taste that rinsing does not remove
- A visible opaque or fibrous fleck that was not present before the meal
- Mild, localized pain that feels mechanical rather than inflammatory
Key Takeaway: Food impaction feels like a specific, localized foreign body. A diffuse ache is more likely normal post-operative pain.
Is It Bad to Get Food in Wisdom Teeth Holes?
Yes, it is bad to get food in wisdom teeth holes because the food debris acts as a nutrient source for oral bacteria, which can colonize the fibrin clot and trigger an infection or dry socket. A single piece of food left in the socket for more than 24 hours measurably increases the bacterial load within the extraction site.
The socket is not a clean, inert hole. It is a wound bed. The blood clot that fills it is composed of fibrin, platelets, and trapped red blood cells. This clot is a sterile biological scaffold. When food debris, which is never sterile, sits on that scaffold, it introduces Streptococcus and other oral flora directly into the healing environment. The body diverts immune resources to the socket to manage the bacterial contamination, which slows epithelialization.
The AAOMS clinical guidelines recommend that extraction sockets be kept free of debris for the entire healing period, which lasts a minimum of two weeks for the soft tissue to close over the site. A single episode of impaction that is promptly treated is not a medical emergency. Repeated impaction that is ignored leads to localized inflammation called alveolar osteitis, a condition that delays bone fill and requires professional debridement.
Key Takeaway: An occasional piece of food is manageable if removed quickly. Letting debris sit for days is an infection risk.
How to Remove Food Stuck in a Wisdom Tooth Hole
To remove food stuck in a wisdom tooth hole, follow a specific sequence: begin with a gentle saline rinse, escalate to targeted irrigation with a plastic syringe, and seek professional help if the debris does not release. Each step requires a precise technique to avoid dislodging the clot.
The most common mistake is using too much force. High-pressure water streams, including those from water flossers or faucet sprayers, generate enough pressure to tear the healing clot away from the bone. The AAOMS specifically warns against using water floss devices on a healing extraction site. The pressure delivered by these devices can exceed 50 psi, while a healing clot can be displaced by as little as 5 to 10 psi of focused water pressure.
The sequence of tools matters. Never go directly to a syringe if you are under 72 hours post-extraction. The clot is simply too fragile. The best approach is a graduated one. Start with the least invasive method and only progress if the food remains visible or palpable after the first attempt.
The step-by-step removal sequence:
- Prepare a cup of warm normal saline using the recipe in the next section
- Take a sip, tilt your head so the affected side is down, and gently rock your head side to side for 15 seconds
- Let the liquid fall passively from your mouth into the sink. Do not swish forcefully
- If the sensation of food remains, wait 30 minutes and try the rinse again
- If you are past the 72-hour mark and your surgeon provided a syringe, follow the irrigation protocol exactly
- If the particle remains after two irrigation attempts, stop and call your dental surgeon’s office
Key Takeaway: Start with a passive rinse. Progress to a syringe only after 72 hours. Stop if two attempts fail and call your surgeon.
The Correct Saline Rinse for a Wisdom Tooth Hole
The correct saline rinse for a wisdom tooth hole is a 0.9% isotonic sodium chloride solution, which you make by dissolving exactly one-half teaspoon of non-iodized salt in 8 ounces of warm, previously boiled or distilled water. This concentration matches the salinity of your blood and tissues, which means it will not sting, burn, or damage the delicate granulation tissue.
The temperature of the water matters. Water that is too hot can scald the healing tissue and increase bleeding. Water that is too cold can cause vasoconstriction and pain. The ideal temperature is body-warm, about 98 to 100 degrees Fahrenheit. Test the water against the inside of your wrist. It should feel neither hot nor cold.
Do not use table salt with iodine. Iodine is an antiseptic that can be irritating to an open wound. Do not use sea salt from a grinder. The grains are irregular in size and the mineral content varies. Non-iodized kosher salt or plain pickling salt works perfectly. Do not add more salt thinking a stronger solution is better. A hypertonic solution above 0.9 percent draws fluid out of the tissue and causes cellular dehydration at the wound margin, which slows healing.
| Rinse Type | Concentration | Effect on Socket |
|---|---|---|
| Normal Saline | 0.9% NaCl | Isotonic, non-irritating, safe for all stages |
| Hypertonic Saline | Over 0.9% NaCl | Draws moisture from tissue, stings, impairs healing |
| Plain Tap Water | 0% NaCl | Hypotonic, causes cellular swelling, can lyse new cells |
| Chlorhexidine Rinse | 0.12% | Antimicrobial, prescription only, follow surgeon’s orders |
Key Takeaway: One-half teaspoon of non-iodized salt in 8 ounces of body-warm water. This is the only formula you should use for the first two weeks.
How to Irrigate a Wisdom Tooth Socket Safely
To irrigate a wisdom tooth socket safely, fill a curved-tip plastic syringe with warm normal saline, position the tip just at the opening of the socket without inserting it deep into the hole, and depress the plunger with gentle, steady pressure. The goal is to float the debris out, not to blast it out.
The syringe provided by your oral surgeon is typically a 12cc Monoject syringe with a curved, blunt-end tip. The curved tip is essential. It allows you to reach the socket without straining your jaw or cheek. Inserting the tip deep into the socket is dangerous. You cannot see the bottom of the socket, and pushing the tip into the clot can dislodge it.
Position yourself in front of a well-lit mirror. Pull your cheek gently outward with a clean finger or the non-dominant hand to expose the surgical site. Position the syringe tip so it is hovering directly above the socket opening, not more than 1 to 2 millimeters inside. Depress the plunger slowly and smoothly. The saline will fill the socket and overflow, carrying small food particles with it.
Irrigation technique sequence:
- Wash your hands thoroughly with soap and water for 20 seconds
- Fill the syringe with the prepared warm normal saline
- Pull your cheek outward gently to visualize the socket in the mirror
- Position the curved tip at the socket opening, do not insert it
- Depress the plunger with slow, steady force, do not pulse or jerk the plunger
- Allow the saline and debris to drain forward into the sink basin
- Repeat up to three times, refilling with fresh saline each time
- Rinse the syringe with clean water and allow it to air dry for the next use
Key Takeaway: Hover the syringe tip at the socket opening. Never plunge it in. Use a slow, steady plunger motion, not a jet.
Can Food Get Stuck in Top Wisdom Teeth Holes?
Food does get stuck in top wisdom tooth holes, but it occurs less frequently and resolves more easily than in lower sockets because gravity naturally drains the upper socket. The maxillary extraction site is oriented downward, which means food particles and liquids tend to fall out rather than settle in.
The upper wisdom tooth socket, located in the maxilla, is anatomically advantaged for debris clearance. When you sit upright or stand, the socket opening faces downward. Saliva flow, gravity, and the natural movement of the cheek combine to clear loose particles. The lower socket, in the mandible, is a bucket. Food falls into it, gravity holds it there, and the constant presence of tongue pressure pushes debris deeper into the hole.
This anatomical difference does not mean you can ignore an upper socket. Large particles, especially those with a sticky or fibrous texture, can adhere to the clot surface even in an upper site. Bread dough, banana mash, and peanut butter are notorious for sticking to extraction sites regardless of their location. The irrigation protocol is identical for upper and lower sockets. The only difference is that you angle the syringe tip upward for an upper socket.
Key Takeaway: Lower sockets are food traps by design. Upper sockets drain naturally. Sticky foods are the equalizer that can jam either location.
Tools to Never Use to Remove Food from an Extraction Site
Certain common household items are dangerous to use inside a healing extraction socket. The list of banned tools includes toothpicks, interdental brushes, water flossers, finger probing, metal scalers, and any object that enters the socket without direct visualization.
A wooden toothpick is the most common and most dangerous tool people reach for. Wood splinters easily. A microscopic splinter left in the socket becomes a foreign body nidus for infection. The sharp point also easily penetrates the fibrin clot. Once the clot is disrupted, the underlying bone is exposed to the oral environment. That is the precise mechanism of a dry socket.
Finger probing is equally dangerous and universally underestimated. Fingernails harbor bacteria, including Staphylococcus aureus, even after handwashing. Inserting a finger into the socket introduces a bacterial load that no saline rinse can fully neutralize. The pressure from a fingernail also easily dislodges sutures if your surgeon placed any.
Tools to keep entirely out of your mouth:
- Toothpicks: Splinter risk, clot puncture risk
- Water flossers: Pressure exceeds safe limits, clot dislodgement guaranteed
- Interdental brushes: Wires scratch the bone surface, bristles break off in the socket
- Metal scalers or picks: Zero safe application without professional training
- Fingers: Bacterial inoculation, clot trauma, suture damage
Key Takeaway: If the tool is not a plastic irrigation syringe or a passive saline rinse, it has no business near your extraction socket.
How to Keep Food Out of Wisdom Teeth Holes
You keep food out of wisdom teeth holes by eating only foods with a specific texture profile for the first two weeks and by rinsing immediately after every meal. The most reliable prevention strategy is the texture of the food itself. If the food cannot physically lodge in the hole, no removal is necessary.
The texture profile of a safe post-extraction food is smooth, homogeneous, and fully dissolvable in saliva. Scrambled eggs, Greek yogurt, and mashed potatoes all meet this standard. A food like rice fails it. Individual rice grains are exactly the right size and shape to pack into a socket. The same is true for quinoa, couscous, and any small-grained food.
Eating technique matters as much as food choice. Chew on the side opposite the extraction. Take small bites. Do not use a straw for any liquid, including smoothies, for at least seven days. The suction created by a straw generates negative pressure that can pull the clot out of the socket. The AAOMS considers straw use one of the top three preventable causes of dry socket.
Foods that almost never get stuck:
- Plain Greek yogurt
- Smooth, thin mashed potatoes (made without skins)
- Protein shakes consumed from a cup
- Smooth, blended soups without rice, vegetable chunks, or fibrous ingredients
- Scrambled eggs cooked soft without cheese or vegetable bits
- Applesauce or smooth fruit purees
Key Takeaway: The food texture that prevents impaction is smooth, soft, and fully dissolvable. If a food has individual grains or fibers, avoid it until the socket closes.
What Foods to Eat to Avoid Food Getting Stuck
The foods that prevent food impaction are those that form a smooth, cohesive bolus in the mouth and do not shed individual particles or fibers. This narrows the acceptable food list considerably for the first seven days after extraction.
A cohesive bolus is a mass of chewed food that sticks together. Scrambled eggs form a cohesive bolus. Oatmeal, if cooked very smooth and without whole oat groats, forms a cohesive bolus. A piece of grilled chicken breast, no matter how well-chewed, does not. Chicken and other fibrous meats break into stringy, separate fibers that easily weave into the clot or sutures.
Temperature is a secondary prevention factor. Cold foods like smooth yogurt or chilled protein shakes can constrict blood vessels and slow bleeding in the first 24 hours. Hot foods increase blood flow and can restart bleeding. After the first 48 hours, food temperature is less of a concern, but very hot soup still poses a risk of scalding the healing tissue.
| Food Type | Safe Example | Avoid |
|---|---|---|
| Protein | Scrambled eggs, Greek yogurt, silken tofu | Chicken breast, steak, ground beef |
| Grains | Smooth oatmeal, cream of wheat | Rice, quinoa, couscous, toast |
| Fruits | Applesauce, smooth banana puree | Whole berries, pineapple, dried fruit |
| Vegetables | Smooth mashed potatoes, blended soup | Raw vegetables, corn, peas, broccoli florets |
| Dairy | Yogurt, cottage cheese (small curd) | Hard cheese chunks |
| Liquids | Water, milk, smooth protein shakes | Carbonated beverages, straws |
Key Takeaway: If the food is not fully smooth and does not form a single sticky mass when you chew, skip it until the socket closes over.
A Day-by-Day Post-Extraction Diet Plan
A structured day-by-day diet plan removes the guesswork from post-extraction eating. The timeline is based on the physiological stages of wound healing, beginning with the coagulation phase and advancing through the epithelialization phase.
The first 24 hours are not about nutrition. They are about clot stability. Cold, smooth, non-particulate foods that require zero chewing are the only options. Smooth yogurt, a lukewarm or cool protein shake consumed from a cup, and cold applesauce work. After 48 hours, you can introduce warm foods and slightly more texture, but the food still needs to dissolve in saliva.
The seven-day mark is when most patients can begin eating soft, cohesive foods on the extraction side carefully. By day 14, the soft tissue should be closed enough that normal chewing can resume, though hard, sharp foods like tortilla chips and crusty bread should wait until the three-week mark.
| Day | Healing Stage | Food Choices |
|---|---|---|
| Day 1 (0 to 24 hrs) | Clot formation | Greek yogurt, cold protein shakes, applesauce, ice cream without chunks |
| Day 2 to 3 | Clot stabilization | Add lukewarm blended soups, soft scrambled eggs, smooth oatmeal |
| Day 4 to 7 | Granulation tissue | Add soft pasta, moistened pancakes, cottage cheese, smooth hummus |
| Day 8 to 14 | Tissue closure | Add steamed fish, soft bread, ripe avocado, banana |
| Day 15+ | Maturation | Slowly reintroduce normal foods, avoid tortilla chips and hard crusts until day 21 |
Key Takeaway: Days 1 to 3 are about clot safety. Days 4 to 7 are about gradual texture introduction. Day 8 and beyond is when normal eating slowly resumes.
What Happens If Food Stays in the Socket?
If food stays in the socket for an extended period, it decomposes and creates a localized inflammatory response that can progress to alveolar osteitis or a localized infection. The food itself does not burrow into the bone. The bacterial overgrowth that feeds on the decomposing food is what causes the damage.
The first sign that a food particle has overstayed its welcome is a change in pain character. The dull, improving ache of normal healing is replaced by a throbbing, deep pain that radiates to the ear or temple on the same side. A foul taste that rinsing does not remove and a noticeable odor on your breath are additional signs of bacterial activity in the socket.
The body can sometimes encapsulate and expel a small foreign particle on its own through the normal exudative phase of healing. A larger piece of fibrous food, like a shred of chicken or a popcorn kernel hull, rarely resolves without intervention. The particle acts as a source of constant irritation, and the immune system’s attempt to break it down produces pus and inflammation.
Consequences of unremoved food debris:
- Alveolar osteitis: The clot degrades and exposes bone
- Localized osteitis: Inflammation of the bone wall in the socket
- Surgical site infection: Pus formation requiring professional drainage and antibiotics
- Delayed closure: The socket remains open longer than the typical two-week soft tissue window
Key Takeaway: A retained food particle converts a healing socket into a culture dish. Remove it promptly or have your surgeon do it.
How to Differentiate Food Debris from Healing Tissue
Food debris is distinct in color, texture, and behavior from healing tissue. Granulation tissue, the white or yellowish membrane that forms in the socket around days three through seven, is often mistaken for food or pus. Understanding the difference prevents unnecessary and potentially harmful attempts to “clean” away normal tissue.
Granulation tissue is firmly attached to the socket walls. If you point a syringe at it and irrigate gently, it stays put. A food particle moves, floats, or shifts position. Granulation tissue has a uniform, velvety appearance. A food particle is irregular, opaque, and often has a color that matches the food you ate. The granulation tissue also does not cause a foul odor or taste. Decomposing food does.
Pus is another visual that creates confusion. Pus is thick, opaque, and often yellow or greenish. It flows out of the socket when pressure is applied to the cheek. Pus has a distinct foul odor and taste that is unmistakably bad. Granulation tissue has no odor and does not flow.
| Visual in Socket | Color | Texture | Moves When Irrigated? | Odor? |
|---|---|---|---|---|
| Food Debris | White, brown, green (food-colored) | Opaque, irregular | Yes, dislodges or floats | Foul taste, possible odor |
| Granulation Tissue | Whitish-yellow, pinkish | Uniform, velvety, attached | No, stays firmly in place | None |
| Pus | Yellow, green, gray | Thick, fluid | Yes, flows out slowly | Strong, foul odor |
Key Takeaway: If it moves when you irrigate, it is food. If it stays firmly attached and has no odor, it is granulation tissue. Leave granulation tissue alone.
When to Call Your Dental Surgeon
Call your dental surgeon if you cannot dislodge a visible food particle after two gentle irrigation attempts, if your pain level increases abruptly after day three, or if you notice pus, a fever, or a foul odor that does not resolve with rinsing. These are signs that home care has reached its limit.
A trapped particle that is wedged under a suture or deep in the socket is not a failure on your part. It is a mechanical problem that requires a professional instrument and direct visualization. Your surgeon can remove the debris in seconds using a dental curette and a suction device. The procedure is quick, does not require additional anesthesia beyond what the site already has, and dramatically reduces the risk of complications.
Do not wait through a weekend of pain if you suspect a problem. Most oral surgery practices have an emergency line or an on-call surgeon. The threshold to call should be low. A clean, debris-free socket heals predictably. A socket that is causing increasing pain deserves a professional evaluation, even if it turns out to be nothing. Your surgeon would rather hear from you unnecessarily than treat a dry socket that could have been prevented.
Key Takeaway: Two failed irrigation attempts, worsening pain after day three, or visible pus are automatic triggers for a phone call to your surgeon.
Frequently Asked Questions About Wisdom Tooth Holes
Can food stuck in a wisdom tooth hole cause an infection?
Yes, food left in a wisdom tooth hole can trigger a localized infection by providing bacteria with a nutrient source directly on the healing wound bed.
The decomposing food supports bacterial overgrowth that can overwhelm the body’s natural immune defenses in the socket.
Prompt removal with saline irrigation almost always prevents the progression to a clinical infection.
How long will food get stuck in wisdom teeth holes?
Food can get stuck in wisdom teeth holes for approximately two to four weeks, which is the time it takes for the soft tissue to fully close over the socket opening.
The most problematic period is the first seven to ten days when the hole is at its deepest and the protective clot is still organizing.
After the socket opening shrinks to a small slit, usually around week three, food impaction becomes rare and eventually stops.
What does a dry socket look like compared to food?
A dry socket looks like a bare, empty hole where the blood clot has been lost, with visible whitish bone at the base of the socket and no covering tissue.
Food debris appears as an opaque, irregular particle sitting on or within a socket that still has its clot or granulation tissue intact.
A dry socket causes a sudden, intense, radiating pain that peaks on days three to five and is not relieved by irrigation or over-the-counter pain relievers.
Is it okay to use a toothpick to get food out of the hole?
No, using a toothpick to get food out of a wisdom tooth hole is dangerous and should never be attempted.
Toothpicks splinter and can leave microscopic wood fragments in the socket, which cause a foreign body reaction and can puncture the blood clot.
The safe alternatives are a passive saline rinse or a plastic irrigation syringe with a blunt, curved tip.
When can I stop worrying about food getting stuck in the socket?
You can stop worrying about food getting stuck when the socket opening has visibly closed to a small, flat slit, which typically occurs between the third and fourth week after extraction.
Once the soft tissue has completely sealed the socket, food cannot enter it, though the gum tissue over the site will continue to remodel for several months.
Continue rinsing after meals until the socket is fully closed as a precaution even during the later weeks.
Getting food out of a wisdom tooth hole safely is a matter of patience, the right tools, and strict adherence to the irrigation protocol. The warm saline rinse and the plastic syringe are your only two reliable instruments. Everything else in your bathroom or kitchen drawer is a threat to the fragile healing process happening inside that socket.
For the next two weeks, eat foods that dissolve smoothly in your mouth. Rinse after every single meal and snack. And if a particle refuses to budge after two careful irrigation attempts, pick up the phone and call your surgeon’s office. A dry socket is far more painful and time-consuming to treat than the two-minute professional debridement that removes a stubborn piece of food.
Healing an extraction site is a partnership between you and your body. Your body builds the clot and the new tissue. Your job is to protect that work by keeping the socket clean and free of debris.